- Share!!
こんにちは!フリーランスエンジニアの雄貴です!
Reactを用いたコンポーネント設計の方針は様々ありますが、
私が普段用いている手法を紹介しようと思います!
Reactのコンポーネント
従来のコンポーネントだと、以下のコードのように関数の中でstate(状態)やfunction(ロジック)を定義し、それを「return」直下のview部分に渡してレンダリングしています。
import React from 'react'

/**
 * InputForm
 * @returns
 */
export const InputForm: React.FC = () => {
  // state (状態)
  const [value, setValue] = React.useState('')

  // function (ロジック)
  const handleChange = (event: React.ChangeEvent<HTMLInputElement>) => {
    setValue(event.target.value)
  }

  // view (UI部分)
  return <input type="text" value={value} onChange={handleChange} />
}
上記はシンプルな例でしたが、より複雑なコンポーネントの場合だとどうなるでしょうか?
例として「NOCHITOKU」ブログの記事ページのコンポーネントを見てみましょう!
ブログ記事ページ
/* import, props部分は省略 */

/**
*  BlogItemTemplate
 * @param props Props
 * @returns
 */
export const BlogItemTemplate: React.FC<Props> = (props: Props) => {
  const { blogItem, highlightedBody, tableOfContents, draftKey } = props

  const image: ImageType = {
    url: blogItem?.image?.url ? blogItem.image.url : '/no_image.png',
    width: blogItem?.image?.width ? blogItem.image.width : 750,
    height: blogItem?.image?.height ? blogItem.image.height : 422,
  }

  const router = useRouter()
  let shareUrl = NOCHITOKU_URL
  if (router?.asPath && typeof router.asPath === 'string') {
    shareUrl = NOCHITOKU_URL + router.asPath
  }

  const metaData: MetaHeadType = {
    title: `${blogItem.title} | ${BASE_TITLE}`,
    description: blogItem.description,
    keyword: 'エンジニア,IT,プログラミング,フロントエンド,AWS',
    image: blogItem.image.url,
    url: NOCHITOKU_URL + router.asPath,
  }


  return (
    <BasePostPageLayout metaData={metaData} breadName={blogItem.title}>
      <section className={styles.container}>
        <div className={styles.image}>
          <Image
            src={image.url}
            alt="Picture"
            width={image.width * 2}
            height={image.height * 2}
          />
        </div>

        <main className={styles.main}>
          <div className={styles.leftBar}>
            {/* SNSシェアボタン */}
            <SnsShareBar title={blogItem.title} shareUrl={shareUrl} />
          </div>

          <div className={styles.rightBar}>
            {/* ブログタイトルエリア */}
            <TitleArea blogItem={blogItem} />

            {/* 目次 */}
            <TableOfContents tableOfContents={tableOfContents} />

            {/* 記事本文 */}
            <HighlightBody highlightedBody={highlightedBody} />

            {/* SNSシェアボタン */}
            <div className={styles.shareArea}>
              <SnsShareArea title={blogItem.title} shareUrl={shareUrl} />
            </div>
          </div>
        </main>
      </section>
    </BasePostPageLayout>
  )
}
コードが長くなっちゃいましたね。。
ロジックとUIの部分を分けて記載はしていますが、可読性は悪くなっています。
1つのコンポーネントファイルに様々な機能を盛り込みすぎると、返って分かりにくくなるので避けた方がいいですね。
Container / Presentational構成
今回、先述した課題を解決する手法として
1つのコンポーネントのロジックとUIを分割する「Container / Presentational構成」を紹介します!
まずはコンポーネントを以下のような構成で作成します。
BlogItemTemplate
   ├── index.tsx  // container層 (ロジック担当)
   ├── Presenter.tsx // Presentational層 (UI担当)
   └── styles.module.scss  // css
1つのコンポーネントを「Container層」と「Presentational層」に分割します。
(styleの記載もついでに分割しています。)
このContainer層は「コンポーネントのロジック」の記述を担当し、Presentational層は「コンポーネントのUI」を担当します。
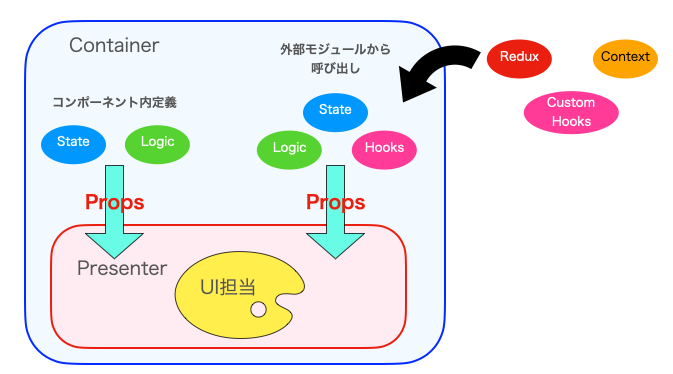
イメージは以下の図のような感じですね。
コンポーネント自体はContainerでPresenterをラップする構造です。
Containerでstateやロジックを定義、またはRedux, ContextAPI, CustomHooksなどの外部モジュールから呼び出します。
そしてContainerからPresenterへPropsで渡し、Presenterは「UIを描画する」のみに専念させます。
これによって1つコンポーネントに対し、「ロジック」と「UI」のモジュールに責務を分割することができます。
具体的なコードは以下の通りです。
■ Container
/**
 * pages/BlogItemTemplate
 * ContainerComponent
 * @package Component
 */
import React from 'react'
import { useRouter } from 'next/router'
/* components */
import { Presenter } from './Presenter'
/* constants */
import { NOCHITOKU_URL, BASE_TITLE } from '@/constants/config'
/* types */
import { MetaHeadType } from '@/types/metaHead'
import { BlogItemType, TableOfContentType } from '@/types/blog'
import { ImageType } from '@/types/image'

/**
 * container
 * @param props Props
 * @returns
 */
export const BlogItemTemplate: React.FC<Props> = (props: Props) => {
  const { blogItem, highlightedBody, tableOfContents, draftKey } = props

  const propsImage: ImageType = {
    url: blogItem?.image?.url ? blogItem.image.url : '/no_image.png',
    width: blogItem?.image?.width ? blogItem.image.width : 750,
    height: blogItem?.image?.height ? blogItem.image.height : 422,
  }

  const router = useRouter()
  let shareUrl = NOCHITOKU_URL
  if (router?.asPath && typeof router.asPath === 'string') {
    shareUrl = NOCHITOKU_URL + router.asPath
  }

  const metaData: MetaHeadType = {
    title: `${blogItem.title} | ${BASE_TITLE}`,
    description: blogItem.description,
    keyword: 'エンジニア,IT,プログラミング,フロントエンド,AWS',
    image: blogItem.image.url,
    url: NOCHITOKU_URL + router.asPath,
  }

  // Presenterをラップ (propsでstateとロジックを渡す)
  return (
    <Presenter
      metaData={metaData}
      blogItem={blogItem}
      image={propsImage}
      highlightedBody={highlightedBody}
      tableOfContents={tableOfContents}
      shareUrl={shareUrl}
      draftKey={draftKey}
    />
  )
}
■Presenter
/**
 * pages/BlogItemTemplate
 * PresentationalComponent
 * @package Component
 */
import React from 'react'
import Link from 'next/link'
import Image from 'next/image'
/* components */
import { BasePostPageLayout } from '@/components/layouts/BasePostPageLayout'
import { SnsShareBar } from '@/components/common/molcules/SnsShareBar'
import { SnsShareArea } from '@/components/common/molcules/SnsShareArea'
import { TitleArea } from './organisms/TitleArea'
import { TableOfContents } from './organisms/TableOfContents'
import { HighlightBody } from '@/components/common/molcules/HighlightBody'
/* types */
import { MetaHeadType } from '@/types/metaHead'
import { BlogItemType, TableOfContentType } from '@/types/blog'
import { ImageType } from '@/types/image'
/* styles */
import styles from './styles.module.scss'

/**
 * props
 */
type Props = {
  metaData: MetaHeadType
  blogItem: BlogItemType
  image: ImageType
  highlightedBody: string
  tableOfContents: TableOfContentType[]
  shareUrl: string
  draftKey?: string
}

/**
 * presenter
 * @param props
 * @returns
 */
export const Presenter: React.FC<Props> = (props: Props) => {
  const {
    metaData,
    blogItem,
    image,
    highlightedBody,
    tableOfContents,
    shareUrl,
    draftKey,
  } = props

  // Propsで受け取ったものをUIとともに描画するのみ
  return (
    <BasePostPageLayout metaData={metaData} breadName={blogItem.title}>
      <section className={styles.container}>
        <div className={styles.image}>
          <Image
            src={image.url}
            alt="Picture"
            width={image.width * 2}
            height={image.height * 2}
          />
        </div>

        <main className={styles.main}>
          <div className={styles.leftBar}>
            {/* SNSシェアボタン */}
            <SnsShareBar title={blogItem.title} shareUrl={shareUrl} />
          </div>

          <div className={styles.rightBar}>
            {/* ブログタイトルエリア */}
            <TitleArea blogItem={blogItem} />

            {/* 目次 */}
            <TableOfContents tableOfContents={tableOfContents} />

            {/* 記事本文 */}
            <HighlightBody highlightedBody={highlightedBody} />

            {/* SNSシェアボタン */}
            <div className={styles.shareArea}>
              <SnsShareArea title={blogItem.title} shareUrl={shareUrl} />
            </div>
          </div>
        </main>
      </section>
    </BasePostPageLayout>
  )
}
メリット
Container/Presentational構成は以下のようなメリットがあります。
- ロジックとUIを分離し、可読性が良くなる
- Storybook (StoryShot)はPresenterのみを対象にすれば良くなる
- ロジックのテストはContainerのみ対象にすれば良くなる
責務を分割することで「保守性が良くなる」ことがメリットですね。
アプリケーションの機能が追加される度に構造が複雑化してしまうので、保守性が悪いと第三者がみた時に解読に時間がかかります。
どこに何があるかパッと見て分かりやすければ、それだけ工数削減にもなりますね。
責務を分割することで、開発者が戸惑うことなく保守できるようになります。
デメリット
保守性が良くなる反面、「コードの記載量が肥大化」することがデメリットではあります。
コード量が多くなることで、JavaScriptのバンドルサイズが大きくなります。
Webブラウザだとそこまで影響はないかもしれませんが、ReactNativeを用いたネイティブアプリだとスマホの容量を無駄に取ってしまうので、ネイティブアプリ開発ではあまり多様しないほうがいいかもしれません。
しかしロジックの記載が多いコンポーネントなど、部分的に採用することで保守性は上がりますので、設計段階で検討して取り入れていくのがベストだと考えています。
最後に
いかがでしたでしょうか?
今回はReactのコンポーネント設計のContainer / Presentational構成について紹介いたしました!
モダンフロントの設計方針は現状これといったものはなく、現場によって独自に発展しているところばかりです。
今回の設計方針も絶対的なものではないですが、知見に入れておくことで設計を考慮する際に役に立てると思います。
今後もReact, Next.jsの設計手法について発信してく予定ですので、良ければご覧いただけると嬉しいです!